

When most people encounter an electric spindle malfunction, their first thought is: Could the bearings be damaged?
Bearing failure is indeed common. However, during practical maintenance, there is another issue that tends to be overlooked, and the repair costs can be substantial.
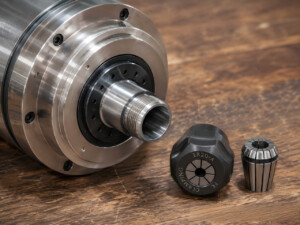
That issue is stripped threads on the spindle rotor.
Though it appears to be merely a thread fault, stripped threads make it difficult to clamp cutting tools securely. Without proper tool clamping, the spindle cannot operate normally for machining, and in severe cases, it may become virtually unusable.
Complicating matters further, damaged rotor threads often cannot be fixed simply by replacing the nut or collet.
If rotor thread damage is extensive, rotor replacement may be required. In the process of disassembling and servicing the spindle, the bearings will also need to be inspected and possibly replaced.
Therefore, a seemingly minor thread defect can ultimately lead to considerable maintenance expenses.
What causes stripped rotor threads?
Most spindles do not fail abruptly. Instead, their threads sustain gradual damage from repeated improper tool mounting practices.
The following operations are particularly damaging to threads:
Cutting tool dimensions outside the clamping range of the collet
Failing to engage the threads by hand prior to tightening
Continuing to wrench tight once binding is felt
Neglecting regular cleaning of nuts and collets
Operating the spindle while dust and chips are trapped within thread crevices
These practices may seem trivial, yet over time they cause thread abrasion, galling and eventual thread stripping.
Preventive Measures — Four Key Guidelines
01 Ensure compatible cutting tool dimensions
Tool diameters must fall within the collet’s specified clamping range.
Out-of-spec dimensions risk splitting the collet and create abnormal clamping loads, which can ultimately damage the spindle rotor.
A quick pre-mounting verification saves far more trouble than later repairs.
02 Avoid forceful tightening from the start
Always engage the threads by hand when mounting tools.
Smooth, snag-free rotation is the expected normal feel.
If binding or stiffness occurs immediately, foreign debris, misalignment or pre-existing thread damage may be present.
Stop and inspect right away — never force the connection.
Countless instances of thread stripping begin with the mindset: “Just apply a little more torque.”
03 Perform low-speed idle run after tool mounting
Do not commence machining immediately after installing the tool.
Run the spindle at low speed for 1–2 minutes to check for runout, abnormal noise or excessive vibration.
This step reveals many clamping faults in advance.
Detecting poor clamping at low speed limits potential losses; discovering the issue mid-machining carries far greater risks.
04 Periodically clean nuts and collets
Dust and chips trapped inside nuts, collets and thread gaps degrade clamping performance and accelerate thread wear.
Routine maintenance should cover not only the spindle main body but also these tool clamping components.
Extra care is necessary under working conditions generating large volumes of dust and chips.
Electric spindle maintenance extends beyond bearing inspections
Small as rotor threads are, they directly determine reliable tool clamping and stable spindle machining performance.
Reducing such failures relies not on reactive repairs after breakdowns, but on standardized procedures every single time you mount a tool.
Many spindles are not worn out through operation — they are ruined by improper mounting and over-tightening.